


MAYDAY MAYDAY! Attention Agents! Club Penguin Journey Operation: Mayday is your first Elite Penguin Force mission, and it’s a big one! Herbert has taken control of the propellers keeping the island afloat, and it’s up to you to sneak up the Toughest Mountain, find his secret lair and shut him down. It first launched during the Festival of Flight party, but it’s now permanently available.
This Club Penguin Journey Operation Mayday walkthrough will show you how to join the EPF, get past every camera, robot and laser and take down Herbert’s computer for good. We’ll also cover the rewards waiting for you at the end of the operation!

Join the Dark Warriors Community!
Enjoy our Club Penguin Journey missions, codes, catalog secrets, stamp guides and more? Join the Dark Warriors Discord server to stay up to date!
Operation: Mayday Walkthrough
Suit up agents, because the Elite Penguin Force is calling! Climb the Toughest Mountain, dodge Herbert’s security and show him who’s boss.


Mission Brief: Mayday, mayday! The island is floating high above the ocean, and Herbert has his hands on the controls. Gary needs an elite agent to climb the Toughest Mountain, stay out of sight and take him down. Good luck, agent!
Starting Club Penguin Journey Operation Mayday
To take part, you must be a PSA member and have completed all 11 PSA missions. Visit the HQ through your Spy Phone and Dot will pop up out of nowhere, welcome you to the team and hand you the EPF Clearance Badge.

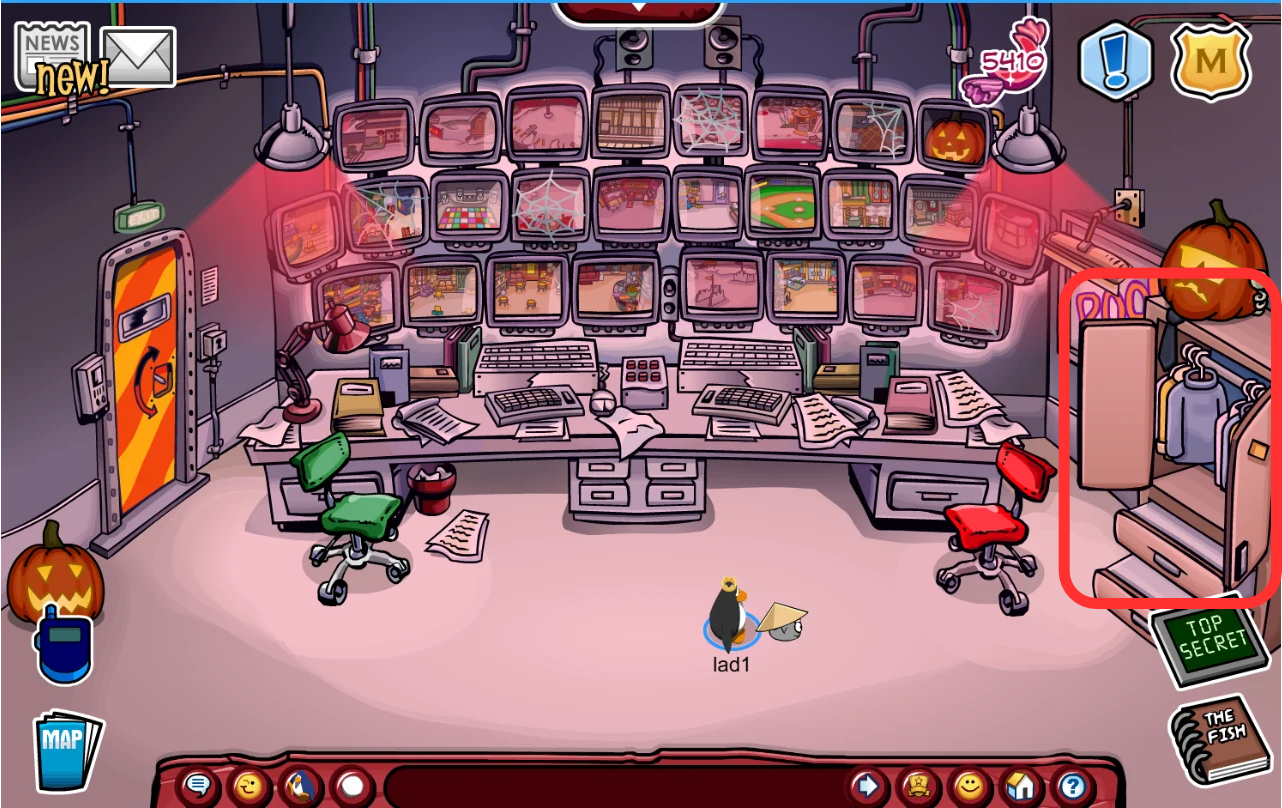
Enter the EPF Command Room through the closet on the right of the HQ and click on the console at the table. Read the mission details, then click Launch Operation when you’re ready. You can also click the phone at the Tour HQ and enter the room that pops up to start the operation automatically.
Gary explains that Herbert is steering the hijacked island towards the equator in search of warmer weather, which would stress the propellers and crash the island into the ocean. You must infiltrate his secret lair and disable his computer so Gary can control the flight system again, and retrieve Rookie’s Spy Phone, which holds internal PSA information. He’ll also hand you an Infrared Tracker, which will come in handy for getting past Herbert’s security.


Equip the Infrared Tracker, which you can wear with your other clothing items. Grab a jet pack from the launch pad on the left of the room and you’re ready to take off!
Climbing the Toughest Mountain
Herbert has cameras watching nearly every room, and they’re your biggest threat on the way up. If one spots you, you’ll be sent back to the start of the room, so throw a snowball at every camera you see to disable it.

Supply Camp
Gary calls as soon as you arrive at the Supply Camp, warning you to get through without being spotted. Throw a snowball at the camera near the wired fence to keep the element of surprise, then open your Spy Phone and click the red button until the scissors appear. Use them to cut through the fence and follow the paw prints into the next area.


Ice Cavern
Gary calls again to warn you about Herbert’s patrolling robots, which are waiting to capture any intruders. Blind the camera near the top of the room with a snowball, then weave between the robots without touching them, as you’ll be sent back if they catch you. Follow the paw prints into the next room.


Base Camp
Flaming logs are blocking your path at the Base Camp, so you’ll need to put them out. Disable both cameras, one at the top and one at the bottom right, to reach the plateau, then hover your mouse over the discarded lantern to take off its lid. Throw snowballs into the lantern until it’s full, then click on it to pour the snow over the flames and cross the logs into the next room.


Mountain
Gary calls to say that time is running out, so there’s no time to waste! Four robots guard the way to the next area, so blind the two cameras with snowballs and carefully waddle between the robots. Step on the red buttons as you pass to turn them green, then cross the wooden plank to reach the next room.


Ice Cave
You’re nearly at the maze, but there’s one last camera on the top right of the room to deal with. Hit it with a snowball for the final time, then follow the footprints through the icy path to reach the Ice Maze.

The Ice Maze
The next three rooms are mazes full of hidden lasers that only show up with the Infrared Tracker. Equip it, avoid the lasers and follow the paw prints towards the ladder, but be patient, as some lasers switch on and off after a set time. If you get caught, you’ll be sent back to the start of the maze, even from the third level.


Make a detour to the top right of the second room to grab the Expedition Key Pin. It’s your way into Herbert’s lair, and a handy pin for your collection too!


The third room adds sweeping sensors on top of the lasers, so be patient and time your moves. Head for the vault door and use the Expedition Key to unlock it and step into Herbert’s lair!

Herbert’s Secret Lair
Herbert is hard at work at his computer while Klutzy snoozes in the corner, and he gives a monologue about taking the island to the Equator, where penguins won’t be able to handle the heat! Gary calls to tell you to disable Herbert’s main computer, and you mustn’t let Herbert see you.

To destroy the computer’s hardware, you need to collect three items scattered around the lair: Rookie’s Spy Phone, a magnet and a spring. Sneak towards each one through the shadows, as you have to be close to it to pick it up.
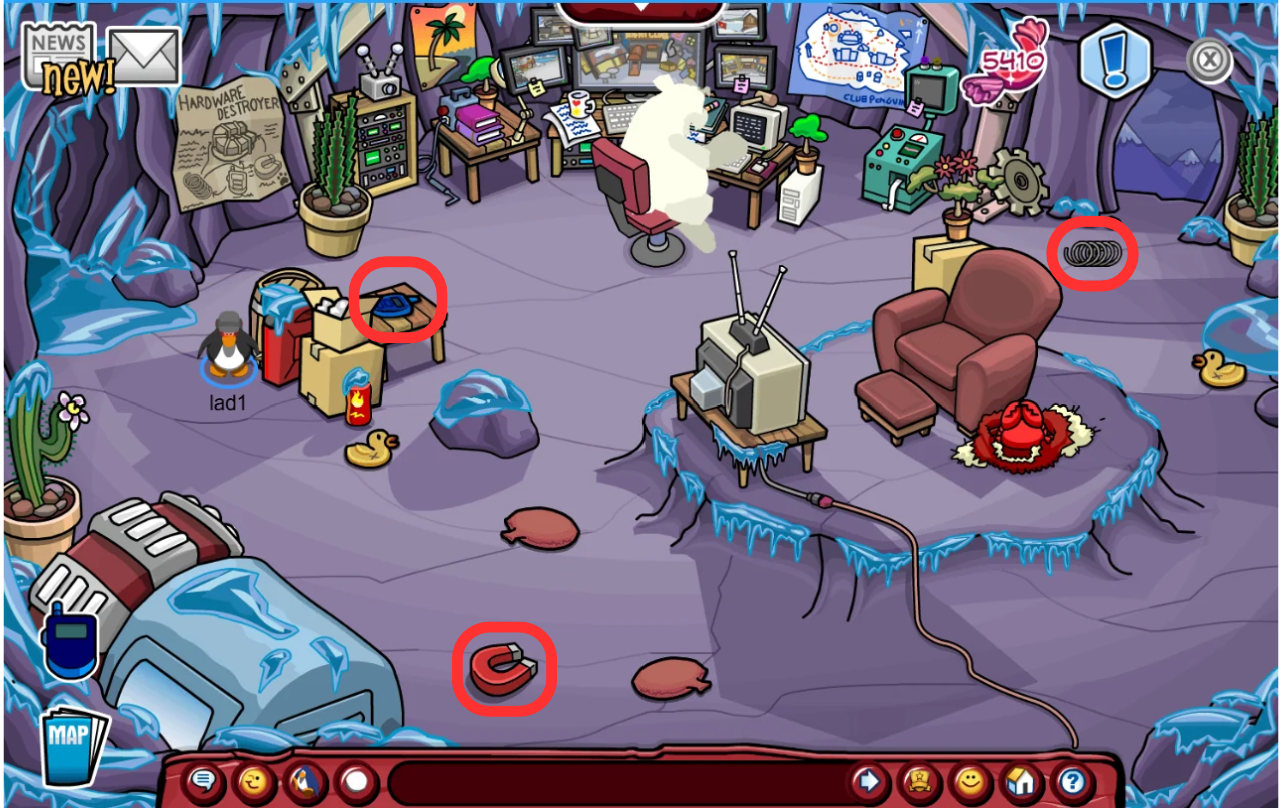
Herbert checks behind himself every so often, so time each grab for when his back is turned. Hide behind the boxes, the rock, the TV or any shadow when he looks your way, and don’t step on the rubber ducks or whoopee cushions or use emotes, as any of them will get you caught.

The three items combine into the Hardware Destroyer pin automatically as soon as you’ve collected them all. Sneak towards Herbert’s computer and click on the Hardware Destroyer to wreck his setup for good.


The room shakes and snow falls on top of Herbert, leading to a short conversation with him. Escape through the opening on the right side of the room, which kicks off a final cutscene before you jet pack back to the island.


Mission Debrief
Back in the EPF Command Room, talk to Gary for the debrief. The propellers are stable again, and the Director sends a message to congratulate you. The Director also says the PSA will be back in action soon, thanks to Rookie’s Spy Phone.


Operation: Mayday Complete!
Congratulations, agent! You’ve successfully completed Club Penguin Journey Operation: Mayday and saved the island from Herbert’s plan. You’ll receive the Operation Mayday Medal, the Hardware Destroyer pin and Herbert’s Operation Mayday Giveaway background.



Missed the PSA missions? Check out our mission guides section and work your way back. Stay tuned for more Club Penguin Journey guides from the Dark Warriors!
Filed under: Club Penguin Journey, Dark Warriors, Mission Guides | Tagged: Dot, Elite Operative, Elite Penguin Force, EPF, EPF Clearance Badge, EPF Command Room, Expedition Key Pin, Festival of Flight, Gary the Gadget Guy, Hardware Destroyer, Herbert P. Bear, Herbert's Operation Mayday Background, Ice Maze, Infrared Tracker, Operation Mayday, Rookie's Spy Phone |


super cool and awesome guide thank you!!
First day at EPF fr how am I keeping this job i have failed half of these missions LOOOL!